FabLab Academy 2016
Sam Guzauskas
Fab Lab Academy 2016
Biography
My name is Sam Guzauskas and I was born and raised in Anchorage, AK.
I am currently attending the University of Alaska Anchorage working on
my Bachelor's of Science in Mechanical Engineering and plan to graduate
this spring, May 2016. I have an addiction to the outdoors and enjoy
getting outside as much as I can. Some of my favorite things to do out
in the Alaskan wilderness is hiking, camping, kayaking, fly fishing, and
backcountry skiing.
 My brother, right, and I on the Kenai River at the end of the summer catching some Rainbow Trout and Dolly.
 Kayaking to work in Valdez, AK
I found out about the Fab Lab Academy through a program on campus
called the Alaska Native Science and Engineering Program, or ANSEP.
Through my experience in different internships and schooling I have been
exposed to some CNC and 3D printing technology, but have never truly
worked with it. Having this experience will hopefully broaden my
understanding of these different technologies and getting myself
immersed in new softwares and technology. I can't wait to see where I'll
be at the end of the program!
Weekly Modules
Week 1 - Principles and Practices, Project Management
This is really my first time developing a website and writing an
html code to create a website. With the help of Steven, he helped me in
downloading the program "Brackets." This program allows the user to
write the code and see a live preview of their website as they are
developing it. Really great, for a first time user to website code.
Figure 1.1 shows the Brackets program and live preview of my site being
developed.
 Figure 1.1: Using Brackets to develop a website with a live preview of it as it is being worked on
With the help of an html cheat sheet, shown in Figure 1.2, and the
program Brackets, I was able to put together this simple website design.
I am hoping as the program moves forward I will be able to develop a
cleaner and more complex web design that will be easy to navigate.
 Figure 1.2: HTML cheat sheet helping in developing a website
Academy Final Project - Proposal
For this semester, I have decided to design and build an LED phone case
for the Samsung Galaxy S5. I want it to be powered externally from the
phone battery and controlled by the bluetooth on the phone. Preliminary
thoughts, I want it to be able to either stay on one color chosen by the
user, or have a random changing of the colors.
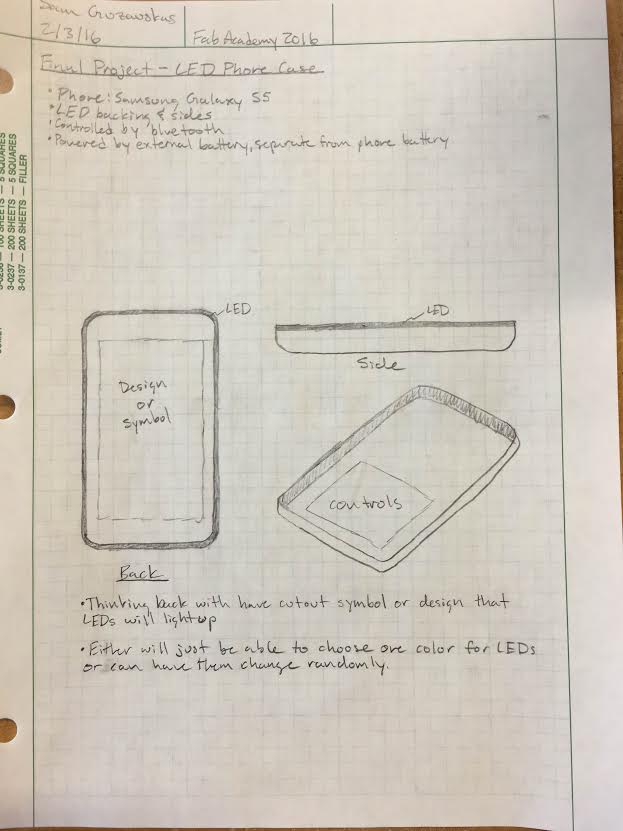
The case will be made out of 3D printed material as it will provide a
good fit for the phone. The design or symbol on the back will be laser
cut and inlaid within the case. Another idea for the backing was to have
it be an opaque with LEDs behind it that would change colors. I would
need to develop a board that controls the LED with a bluetooth set up
that can be connected to the phone.
Week 2 - Computer Aided Design
This is the second week of the program. We were tasked in downloading
the program GitHub for desktop and downloading the archive folder for
the fab lab 2016. Figure 2.1 shows the GitShell program open and
generating the SSH keys.
 Figure 2.1: Using GitShell to generate an SSH key
After seeing this had worked, I downloaded an archive file to my
computer in order to keep track on my progress through the fab lab
academy 2016. Figure 2.2 shows the code ran to download the archive file
to my computer and Figure 2.3 shows that the file had successfully
downloaded onto the computer.
Figure 2.2: GitShell showing the code had run and the file was downloaded successfully onto my computer
 Figure 2.3: File downloaded successfully from the program GitShell
Week 2 - Project Development
This week we were tasked in designing our project and laying it out in
2D and 3D drawings. To start my final project drawings, I needed the
basic dimensions of the Samsung Galaxy S5 so I could determine how big
my case needed to be to hold the phone. Dimensions were found off of the
following page:
Samsung Dimensions.
Now it was time to choose a program that I could draw up my case. Within
my engineering school experience, I am most use to programs like
AutoCAD and SolidWorks. But the licenses for these programs can get
pretty expensive, so I wanted to try out some of the other programs
suggested by Fab Academy as well as some suggested by the local students
here in Alaska.
After some research, I decided to go with the program CorelDraw.
CorelDraw has a nice layout and was really easy to pick up. One of the
things I did like about it was it provided hints/tips when you clicked
on one of the tools. This made it very easy to pick up and use. Figure
2.4 shows the layout of CorelDraw.
 Figure 2.4: Layout of CorelDraw
Using this program I drew up the basic dimensions for the Samsung Galaxy
S5 (Figure 2.5). From this I was able to draw up the size of the case I
wanted for now (Figure 2.6). An idea I had was to have casings on the
back that you would be able to snap in and out to be able to change the
design on the back. A couple of the designs I have come up with are
shown in Figure 2.7.
 Figure 2.5: Base dimensions for Samsung Galaxy S5
 Figure 2.6: Base dimensions for case
 Figure 2.7: Designs for different casings on back
I also wanted to layout my basic schematic for the circuit that would
control the LEDs. The program I used was called "Eagle." This program
allows you to download libraries of components and then lets you choose
which components you want in your circuit. With the help of Kadin, he
let me know which components I would need in my circuit and how it would
need to be laid out since I have little knowledge with this type of
stuff. In the schematic (Figure 2.8) this shows a microcontroller that
has six RGB LEDs connected to it. I chose to have six after testing a
similar LED here in the lab just as is, as well as within an opaque
object. These images are shown in Figure 2.9.
 Figure 2.8: Schematic for basic circuit layout for LED control
Figure 2.9: LED Test and LED within an opaque object
Now it was time to model my phone case using a 3D program. After
watching Dr. Neil's Academy video from this week, one suggested program
was Creo. I decided to give this program a shot. It did take a long time
to download, but I'm happy I waited. Through my engineering school
career, I was most used to the 3D program SolidWorks. I was pleased that
Creo was pretty much layed out the same way, with subtle differences.
It was an easy program (for me) to pick up.
With the 2D drawings from CorelDraw, I was able to mock up a case and
the basic phone in Creo as shown in Figure 2.10. My idea is that the
case would be a rubber case in which the circuit board and LEDs would
lay out in the case behind the phone. A button would be rigged up on the
case that would control the LEDs. One push would turn on all the red
LEDs, the next push would turn on all the green LEDs, and the next one
would turn on all the blue LEDs. A fourth push of the button would cycle
randomly through the different LEDs.
 Figure 2.10: Basic case and phone assembly using the program Creo
As mentioned before, I wanted to have the option for the user to change
the backing on the case. A rendered image of the 3D model with one of my
designs for the back is shown in Figure 2.11. This backing would be
laser cut out and be able to snap into the back of the case.
 Figure 2.11:Basic design of plastic backing on case

